


5 ways to REFASH Diyas for Diwali
The essence of festive season is in the merry lighting and Diyas have always been a very important part of all Diwali celebrations. To make the festive season greener and more conscious for you, we are sharing different ways you could create your own upcycled diyas using household items that are easily available!
Bottle Cap Diyas
Materials Required: Crayons or wax, bottle caps, pre-waxed wicks, can or a vessel, a pan, and your favourite perfume!
- Collect crayons of colors you want your Diyas to be, remove the paper from them. You can also use candle wax instead.
- Put the crayons in an empty, clean can or vessel.
- Take the pre-waxed wicks and place one in each bottle cap. (You can place a wax paper or even newspaper below the bottle caps so in case you spill some wax, your floor or platform won't get dirty)
- Fill the cooking pan with some water and place the can or vessel in it. Boil the water in the pan which will melt the crayons. (Crayons melt pretty quickly and it’ll only take a few to fill a cap)
- Pour the melted crayons or wax into the bottle cap, add some liquid from your favourite perfume of better smell and let it cool for 1-2 hours.
- Cut the wick to the size you want.
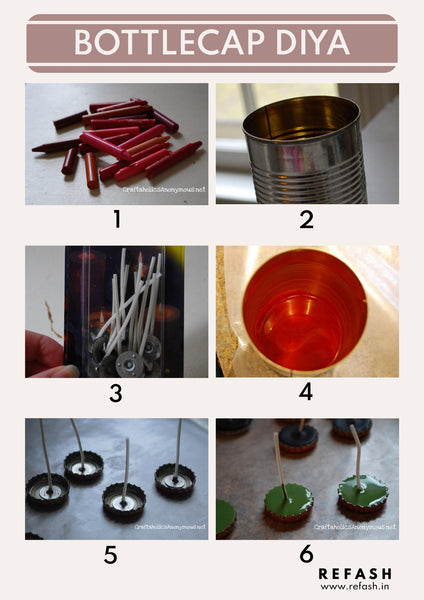
(Content & Image Credits - Craftaholics Anonymous)
Orange/ Lemon Peel Diya
Materials Required: A big Orange or Lemon fruit, knife, vegetable oil, or any other kind of oil, spoon, cutting board
- On the Orange/ Lemon, mark a line throughout the centre to cut it in halves.
- Use the knife to cut it, you will get two halves that can be converted into Diyas.
- With the help of a spoon, scoop out the pulp while carefully leaving the stem-like growth in the middle of each half. This will act as the wick. Make sure all pulp is removed to ensure a smooth peel left behind.
- Pour some oil in the hallowed halves and light the wick.
- Orange/ Lemon Peel Diya is ready!

(Content Credit - Felt Magnet ; Image Credit - Pinterest)
Pista Shell Diya
Materials Required: Cardboard sheet, Pista Shells, Fevikwik, Circular Wax Candles, Paints.
- Take your cardboard sheet and make circles of 10cm diameter. And cut out each one.
- Measure the circular wax candles you have. Make another circle in the center of the cardboard cutouts of the same measurement as the candles.
- Start sticking the pista shells using fevikwik in an upright position from outline of the inner circle you created. ( Sticking the shells will take time, apply pressure on the pista shells to make sure it sticks well)
- Keep sticking the pista shells in concentric circles till you reach the edge of your cardboard cutouts.
- Let the shells dry and get stuck properly. Once that is done gently apply colour of your choice to the shells and cardboard circle in the center.
- Place the wax candle in the middle and you have your beautiful, upcycled diyas ready from food waste!
Wheat Flour Diya
Materials Required: One cup wheat flour, Water as required, Paints.
- To start, preheat the oven to 200 degrees celsius.
- In a bowl, put the wheat flour and start adding water while you knead the dough tight.
- Divide the dough into 5 equal portions and make small balls using your palm. Press your thumb in the center of each ball to create a cavity
- Now start shaping the balls into diya by flattening the sides. Make sure to make a pointed protrusion where you will place your wick.
- Make all the diyas in a similar manner and put them on a baking tray lined with aluminum foil. Bake the diyas at 200 degrees celsius for 20 mins
- Let the diyas dry and then paint them in colours you’d like.
- Pour oil and place the wick. Your diya is ready!
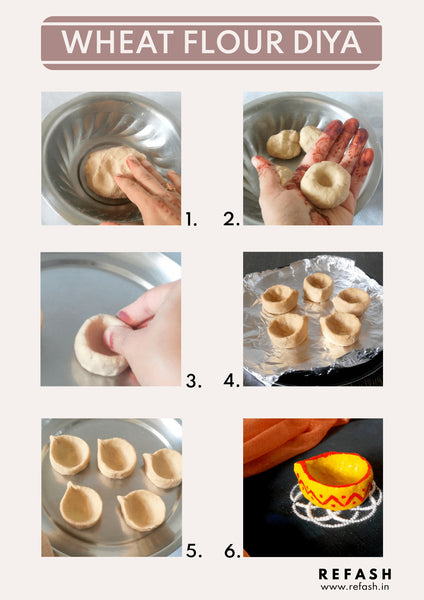
(Content & Image Credits - My Little Moppet)
Pressed Flower Jar Diya
Materials Required: One glass jar, natural wax of your choice, a natural wick, dried flowers or herbs (100% dry), clean empty vessel and pan, old paintbrush, knife, cutting board
- Chop the wax block into small chunks on the cutting board to make sure they fit in the empty vessel
- Pour some water into the pan and place the vessel with wax on it. Heat on medium until the wax is melted
- Dip the paintbrush in the melted wax and apply the dried folders to the insides of the jar with its help. The flowers may not completely stick, but it will surely help.
- Dip the metal end of the wick into the melted wax and place it into the jar
- To keep the wick from sinking, gently tie it to a pencil. While wearing oven mitts, carefully pour the melted wax into the jar until it’s full.
- Allow the wax to cool down and trim the wick as required.
- You now have a beautiful Mason Jar Diya at your hands.

(Content & Image Credits - Free People)
--
Shop upcycled gifts here.
Discover more DIYs here.
Leave a comment